How To Diagnose A Failing Brake Pad
Your brake pads wear out over time. If not checked and replaced in time, worn brake pads can jeopardize your safety and damage the rotors.
The good news is that it’s easy to determine whether or not your brake pads need to be replaced. We’ll show you how.
Warning Signs of Worn Brake Pads
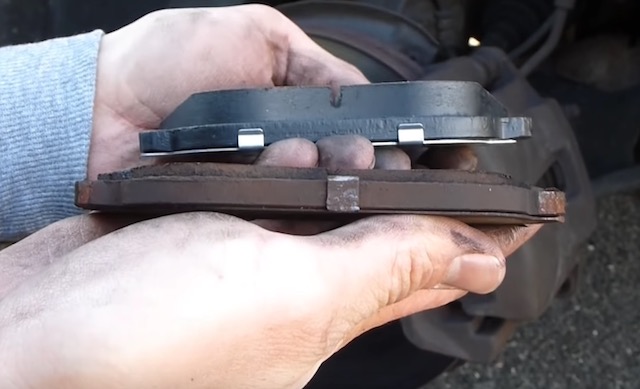
Image Credit: ChrisFix
It’s easy to overlook worn brake pads if you don’t know what to look for. If you’re aware of the most common symptoms of worn brake pads, you can take care of the issue before it really jeopardizes your safety on the road. Here’s a list of some of the most common signs of worn brake pads:
- Squeaking, squealing, or grinding noises
- Vibration, scraping, or wobbling when the brakes are applied
- Spongy feel in the brake pedal
- Vehicle pulling to one side when the brakes are applied
Different Ways to Check Your Brake Pads
There are several different ways to check your brake pads:
- Remove the wheel and caliper, and then thoroughly inspect the brake pads
- Remove the wheel and then check the brake pad thickness visually
- Use a small mirror to look at the brake pad thickness through the spokes
The first method is the best method of them all. By removing the wheel and the caliper, you’ll be able to inspect the brake pads more thoroughly. While the other methods allow you to measure the brake pad thickness, they don’t allow much room for you to inspect the wear patterns, the evenness of the brake pad wear, the rotors, and more.
In this tutorial, we’re going to walk you through the process of removing the wheels and calipers and thoroughly inspecting your brake pads and related parts.
Tools You Will Need
Gather together the following tools:
- 13 mm, 18mm and 21 mm socket and ratchet with piece of pipe for leverage
- Flat blade screw driver
- Pliers
- Jack and jack stands
- Torque wrench
Also, make sure you have gloves, goggles, and no loose jewelry on.
Accessing Your Brake Pads
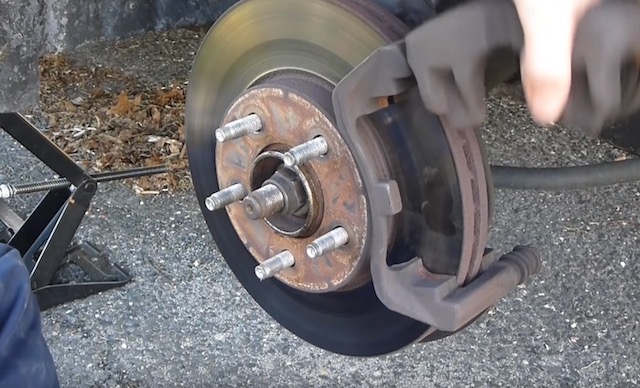
Image Credit: ChrisFix
The process basically involves lifting the vehicle, taking the wheel off, removing the caliper, and then inspecting the brake pads. The process varies slightly between Ford models. Below is a list of steps for the 2005 F-150 model. It's basic enough to follow with another Ford model.
- Take the flat screwdriver and then pop open the hub cap covers to expose the lug nuts.
- Loosen up the lug nuts with the 21 mm socket and ratchet. Use the pipe as an extension to the ratchet if you need extra leverage.
- Lift the truck with a jack stand.
- Support the truck's frame or the bottom of the front differential with jack stands.
- Remove the lug nuts from one of the wheels and then pull off the wheel.
- Through the caliper window, pry the brake pads away from the rotor to loosen them up a bit. Be careful not to scratch the rotor.
- Look behind the caliper and then find the two bolts holding it in place. Remove these bolts.
- Pull the caliper off the rotor and then carefully place it out of the way. Do not hang it from the brake line. You can use a bungee cord to hold it in place or place it on something high enough not to allow the caliper to hang by the brake line.
- Remove the brake pads from the caliper. Be sure to remember which pad goes on which side of the caliper. There are noticeable differences.
Checking the Thickness of the Pad Friction Material
To check the thickness of the brake pad friction material, you need either a centimeter ruler or a brake pad thickness gauge. Simply measure the friction material thickness. Be sure not to include the metal backing plate thickness.
If the thickness is:
- Below 3mm (red zone): the brake pad is severely worn and it needs to be replaced right away
- Between 4mm and 7mm (yellow zone): the brake pad is pretty worn but it still has some life left; replace it soon though
- 8mm or over (green zone): the brake pad still has a lot of pad life left
If you need to replace your brake pads either immediately or soon, you can save a lot of money by ordering genuine OEM Ford brake pads from us at wholesale pricing.
Checking Other Parts While You’re at It
While you have the wheel off, it’s a good idea to use the opportunity to check other parts. More specifically:
- Check for leaks on the calipers or brake lines
- Inspect the rotors for any signs of damage: chipping, pits, rust, heat spots, blue spots, and warping
When you have everything checked, put the brake pads back into the caliper (be sure to put the pads in correctly) and then reassemble everything in the reverse order of removal.